Employee Availability Form
Choose the days, the layout and the fields you need, then print a blank availability form for your staff.
Recent
Your last 10 settings, saved only in this browser. Nothing is uploaded.
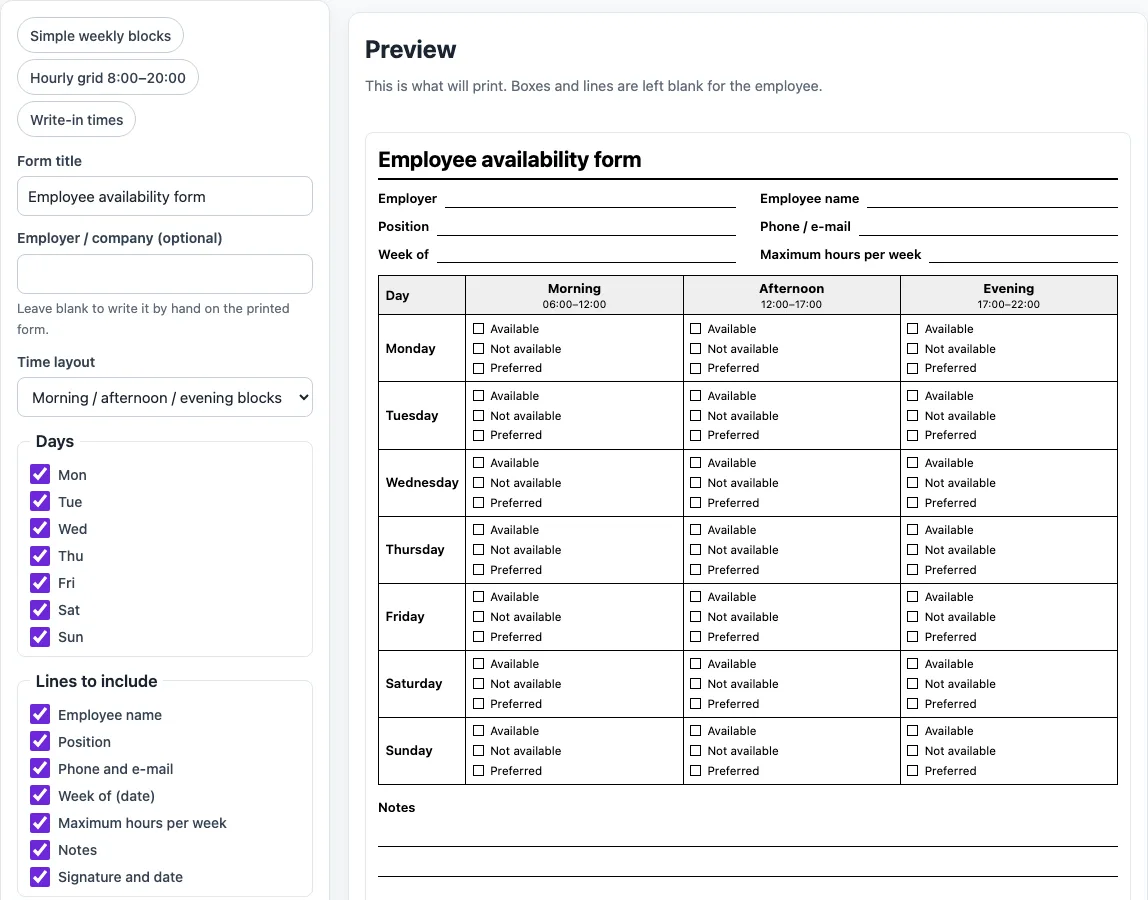
How to use the Employee availability form
- Type an employer name in the options panel if you want one. It is optional, up to 60 characters, and prints on an Employer line at the top of the form.
- Change the form title if the default, “Employee availability form”, does not suit. A title is cut at 80 characters, and a blank title goes back to the default.
- Type an employee name if you are making a form for one person. The name appears in the header.
- Tick or untick the header lines: employee name, position, phone and e-mail, week of, and maximum hours per week. All are on by default. The notes block and signature and date line are also part of the printout.
- Tick the days you need, from Monday to Sunday. All seven start ticked, and at least one day must stay ticked.
- Open the time layout select and pick blocks (the default), hours or ranges.
- If you chose hours, set the first hour and the end hour. The default is 06:00 to 22:00. The end hour must be later than the first hour.
- Or press one of the presets: simple weekly blocks, hourly grid 8:00–20:00, or write-in times.
- Check the live preview, then press Print.
How many rows and columns will my form have?
The layout you pick sets the size of the grid. Blocks gives one row per ticked day and three columns: Morning (06:00–12:00), Afternoon (12:00–17:00) and Evening (17:00–22:00). Each cell holds Available, Not available and Preferred tick boxes, so seven days give 7 rows and 3 columns.
The hourly grid gives one row per hour and one column per ticked day. The default 06:00 to 22:00 gives 16 rows, from 06:00–07:00 up to 21:00–22:00, and 7 columns for seven days. Monday to Friday with 08:00–20:00 gives 12 rows and 5 columns.
Ranges gives one row per ticked day, with two empty cells labelled From and To. Seven days give 7 rows and 2 columns, and the employee writes the times by hand.
Why does the form not set any scheduling rules?
The form is only paper to fill in. It does not state rules about scheduling, rest periods, overtime or pay. What the employer does with the answers is up to the employer, so the form records availability and nothing more.
Which layout should I use?
Use the blocks layout for a simple morning, afternoon and evening choice with Available, Not available and Preferred boxes. Use the hourly grid when staff need to mark exact hours; you set the first and last hour. Use write-in times when people have unusual hours.
What can I leave out?
Every line under “Lines to include” is optional, and you can switch off days you do not use. The sheet is only a form: it records what staff write on it and calculates nothing.
The form never records anything itself: you print it, and people write on the paper copy.
Worked examples
| Input | Result |
|---|---|
| Morning / afternoon / evening blocks, 7 days | 7 rows, 3 columns |
| Hourly grid, 5 days | 12 rows, 5 columns |
| Write-in from and to times, 7 days | 7 rows, 2 columns |
Calculated by the tool above; open it with the same values to see each step.
Frequently asked questions
Why does the hourly grid show an error or a warning?
An error appears when the end hour is not later than the first hour, so set the end hour after the start hour. A warning appears for 0 to 24, which gives 24 rows and may not fit on one portrait page. A range such as 8 to 20 gives 12 rows and is easier to fit on one page.
Can I untick every day?
No. At least one day must stay ticked, and all seven are ticked by default.
How does the printed form look?
The printout is portrait and black on white, with large empty boxes and cells for writing by hand. When the hourly grid has more than 14 rows, its rows are made tighter so the grid still fits the page.
Can I use the form on a phone?
Yes. On a phone the options stack in one column, and the preview scrolls sideways inside its own box so you can check the layout before you print.
Is this tool free, and is anything I type uploaded?
Yes, it is free and needs no account or sign-up. Everything is calculated in your browser, and nothing you type is uploaded.
Can I print it or share it?
Yes. Print / save as PDF prints the page as you see it; choose Save as PDF in the print dialog to keep a file. Copy link copies a page address that stores your inputs, so the same schedule can be reopened later or sent to someone else.
Related tools
- On-Call Rotation Schedule: who is on call in each period, with a calendar file.
- Rotating Shift Schedule: build your own rotating pattern and check the cover.
- Work Schedule Maker: build a schedule with auto-fill patterns and copy last week.
- Weekly Work Schedule Template: plan a week of shifts for your team and print it.
- 12 Hour Shift Schedule: compare the common 12-hour shift patterns.